
Source Context
You'll need to enable the Source Context feature to see your source code as part of stack traces in Sentry. You can either do this:
- By adding one of a build tool plugin to your projectRepresents your service in Sentry and allows you to scope events to a distinct application.
- Or, by manually uploading your source bundle using the Sentry CLI
This document covers both methods. You can find more information about uploading via the CLI in our Debug Information Files docs.
UUIDs
A random UUID must be generated and placed into the sentry-debug-meta.properties. The same UUID must be used to upload the source bundle file. Whenever an error is sent to Sentry, this UUID is sent alongside the error, allowing
the Sentry server to look up source code in the source bundle with a matching ID.
If you're using a build tool plugin, these steps happen automatically.
All of the following methods require org, project and an authToken.
You can create an auth
Known Limitations
- Files with same name but different extensions will lead to undefined behavior
- e.g. MainActivity.java and MainActivity.kt will both be renamed to MainActivity.jvm
- Package declaration and file tree must match for source lookup to work
- e.g. a class io.sentry.sample.MainActivity.java has to be stored in io/sentry/sample
Using the Gradle Build Tool Plugin
We have a Sentry Gradle Plugin available.
Set the auth
export SENTRY_AUTH_TOKEN=sntrys_YOUR_TOKEN_HEREAdd the Sentry Gradle plugin to your
Make sure the assemble task is executed.
plugins {
id "io.sentry.jvm.gradle" version "4.1.1"
}
sentry {
// Enables more detailed log output, e.g. for sentry-cli.
//
// Default is false.
debug = true
// Generates a JVM (Java, Kotlin, etc.) source bundle and uploads your source code to Sentry.
// This enables source context, allowing you to see your source
// code as part of your stack traces in Sentry.
//
// Default is disabled.
includeSourceContext = true
// Includes additional source directories into the source bundle.
// These directories are resolved relative to the project directory.
additionalSourceDirsForSourceContext = ["mysrc/java", "other-source-dir/main/kotlin"]
org = "example-org"
projectName = "example-project"
authToken = System.getenv("SENTRY_AUTH_TOKEN")
}Using the Maven Build Tool Plugin
We have a Sentry Maven Plugin available.
Set the auth
export SENTRY_AUTH_TOKEN=sntrys_YOUR_TOKEN_HEREAdd the Sentry Maven Plugin to your
pom.xml file:<build>
<plugins>
<plugin>
<groupId>io.sentry</groupId>
<artifactId>sentry-maven-plugin</artifactId>
<version>0.0.6</version>
<!-- Required to allow auto-install of Sentry SDK and Integrations -->
<extensions>true</extensions>
<configuration>
<!-- for showing output of sentry-cli -->
<debugSentryCli>true</debugSentryCli>
<!-- optionally specify the path to sentry-cli -->
<!-- download it here: https://github.com/getsentry/sentry-cli/releases -->
<!-- minimum required version is 2.21.2 -->
<!-- by default the sentry-cli bundled with the plugin will be used -->
<!-- <sentryCliExecutablePath>/path/to/sentry-cli</sentryCliExecutablePath> -->
<org>example-org</org>
<project>example-project</project>
<!-- in case you're self hosting, provide the URL here -->
<!--<url>http://localhost:8000/</url>-->
<!-- provide your auth token via SENTRY_AUTH_TOKEN environment variable -->
<authToken>${env.SENTRY_AUTH_TOKEN}</authToken>
</configuration>
<executions>
<execution>
<goals>
<!-- Generates a source bundle and uploads it to Sentry. -->
<!-- This enables source context, allowing you to see your source -->
<!-- code as part of your stack traces in Sentry. -->
<goal>uploadSourceBundle</goal>
</goals>
</execution>
</executions>
</plugin>
</plugins>
...
</build>You must manually download sentry-cli for your required architecture and point
the Maven Plugin to it using sentryCliExecutablePath.
You can get the latest release from the following URL:
https://github.com/getsentry/sentry-cli/releases/tag/2.23.2Manually Uploading Source Context
If you're using a build tool we don't support, or you prefer not to use Sentry's build tool plugins, you'll need to create and upload source bundle files manually using the Sentry CLI.
The sentry-cli commands allow you to supply --org and --project as well as provide the auth
SENTRY_AUTH_TOKEN environment variable.You can also use a .sentryclirc or a .properties file, which you can link using the SENTRY_PROPERTIES environment variable.
Creating the Source Bundle
First, create the source bundle containing your source files:
sentry-cli debug-files bundle-jvm --output path/to/store/bundle --debug-id A_VALID_UUID path/to/source-codeUploading the Source Bundle
Next, upload that source bundle to Sentry:
sentry-cli debug-files upload --type jvm path/to/bundleConfiguring the SDK
You'll need to tell the SDK which source bundle it should use for providing Source Context via one of the following options:
sentry-debug-meta.properties
Add a sentry-debug-meta.properties file to your application resources at build time which will be picked up automatically by the SDK.
io.sentry.bundle-ids=A_VALID_UUIDsentry.properties
bundle-ids=A_VALID_UUIDSentryOptions
options.addBundleId("A_VALID_UUID");Setting Up Code Mappings
To use suspect commits and stack trace linking, you'll need to set up a code mapping. This is a mapping between the source code in your repository and the source code in your stack traces. You can find information on how to set up code mappings in our Set Up Code Mappings docs.
Use the following steps to determine the correct Stack Trace Root Source Code Root while setting up your code mapping:
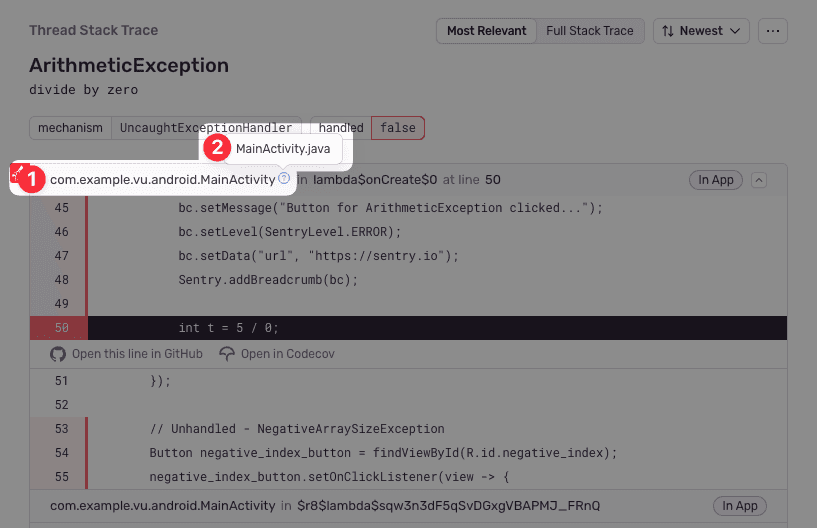
First, navigate to a stack trace that you wish to map. Find an In App frame, which is denoted by a bubble on the right side of the frame. The Java module will be shown as the first piece of text at the left hand side of the frame header (marked as 1 in the below screenshot). In this example, it is com.example.vu.android.MainActivity. Hovering over the module will show the absolute path to the file (marked as 2 in the below screenshot). In this example, it is MainActivity.java.
Next, calculate the derived file path. Take the frame module and replace all . characters with /. Then, replace the last item (MainActivity in this example) with the absolute path found earlier (MainActivity.java). In this example, the derived file path is com/example/vu/android/MainActivity.java.
Finally, compare the derived with the path found in your source repository. In this example, the com/example/vu/android/ folder may match the src/com/example/vu/android/ folder in the source code. Using that information, set the Stack Trace Root to com/example/vu/android/ and the Source Code Root to src/com/example/vu/android/. This tells Sentry to replace all file paths beginning in com/example/vu/android/ with src/com/example/vu/android/ when searching for the source code.
Because Sentry will use the first matching code mapping, it is recommended to always provide a non-empty value for the Stack Trace Root when possible. An empty value in the Stack Trace Root will match all file paths, which will work poorly if multiple code mapprings are required.
Our documentation is open source and available on GitHub. Your contributions are welcome, whether fixing a typo (drat!) or suggesting an update ("yeah, this would be better").
- Package:
- maven:io.sentry:sentry
- Version:
- 7.1.0
- Repository:
- https://github.com/getsentry/sentry-java
- API Documentation:
- https://javadoc.io/doc/io.sentry